
Commercial Roofing
How 5V Crimp Metal Roofing Is Installed in Florida
5V crimp metal roofing is installed over a solid deck and an approved underlayment, with panels overlapping at the outer V ribs and secured with exposed gasketed screws driven through the flat of the panel. In Broward and Miami-Dade, the screw pattern comes from the assembly's product approval rather than from habit, and it is verified at inspection.
John Kraja
Certified Roofing Contractor, License CCC1329271 | Roofing Network
7 min read
Key takeaways
5V panels carry five ribs: two paired V crimps at each edge and one in the centre, with the edges overlapping.
Exposed gasketed screws are driven through the flat of the panel, not through the rib, to the pattern in the product approval.
Minimum slope for exposed fastener panels is generally 3:12, lower only with an approved underlayment assembly.
Panel life is commonly 40 years or more, but the neoprene washers on the screws are a maintenance item at roughly 15 to 20 years.
Typical installed cost is around $9 to $16 per square foot in South Florida, below standing seam.
5V crimp metal roofing is installed over a solid deck with an approved underlayment, then panels are laid so the outer V ribs of adjacent sheets overlap, and secured with exposed gasketed screws driven through the flat of the panel into the deck or purlins. Minimum slope is generally 3:12. In the High Velocity Hurricane Zone the fastener type, spacing and pattern come from the assembly's Miami-Dade Notice of Acceptance rather than from convention, and they are checked at inspection. It is a straightforward system that is unforgiving of shortcuts.
5V crimp is the metal roof most people picture when they picture old Florida: a simple ribbed panel on a cracker house, a porch, a barn. It is still specified constantly, because it is the least expensive route onto a metal roof and it performs well when installed correctly.
The catch sits in that last clause. Every fastener is exposed to the weather, so the install quality is the roof.
What 5V crimp actually is
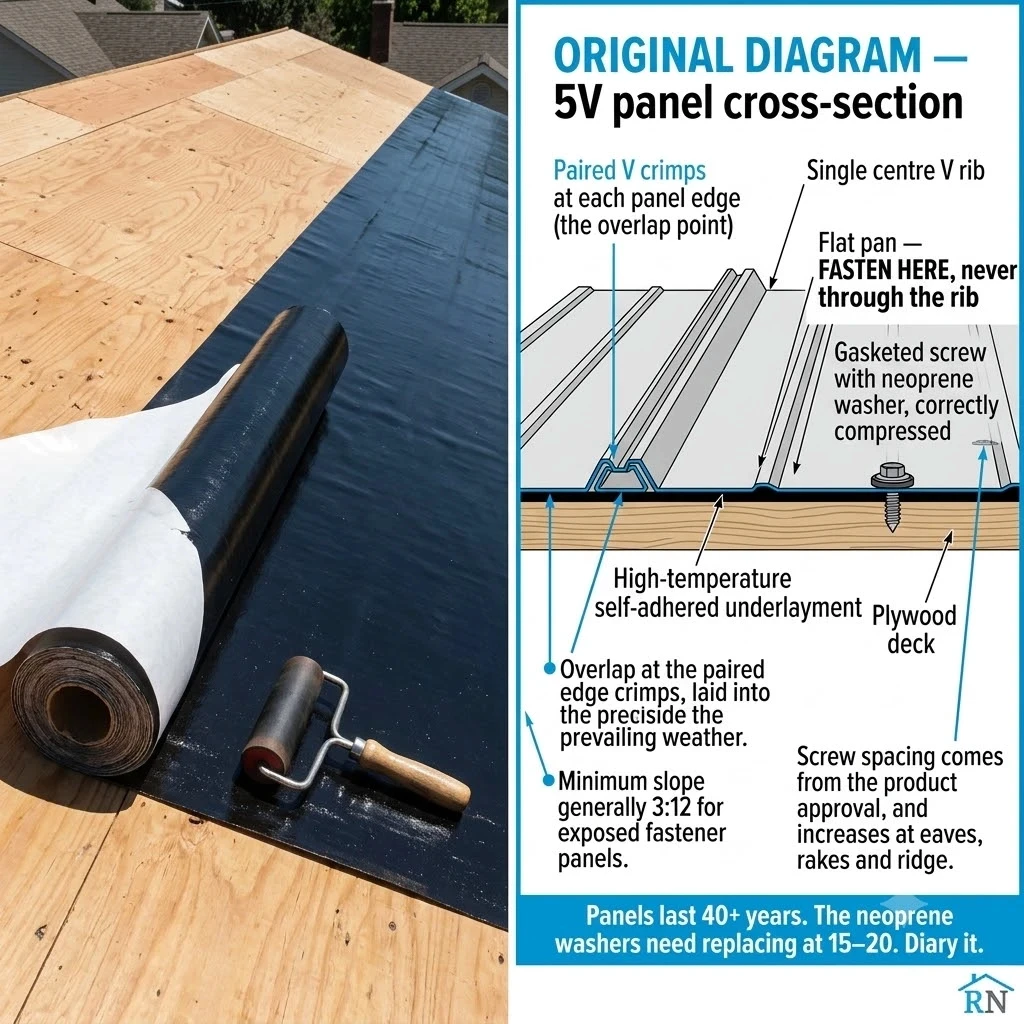
The name describes the profile. Each panel carries five raised ribs: a pair of V crimps at each edge and a single V in the centre. Adjacent panels overlap at the paired edge crimps, so the seam sits raised above the water plane rather than flat in it.
Typical panels give around 24 inches of coverage, in 26 gauge or the heavier 24 gauge steel with a Galvalume coating, or in aluminium where salt exposure is severe. Coastal South Florida is a genuine case for aluminium, because within a few miles of the water the corrosion environment is aggressive and the price difference buys real service life.
Compared with the alternatives: standing seam hides its fasteners under a folded seam and costs considerably more; exposed fastener ribbed panels like PBR are more common on commercial and agricultural buildings. 5V sits at the affordable end with a distinctly residential and traditional appearance. Our standing seam page and PBR panel page cover the two nearest alternatives.
The install sequence
Tear off and inspect the deck. 5V needs a solid deck on residential work. Replace any rotten or delaminated sheathing, and re-nail the deck to current requirements, which on a Florida re-roof is generally ring shank nails at a specified spacing rather than the staples used on older homes.
Install the underlayment. This is the waterproofing layer beneath the metal. In the High Velocity Hurricane Zone a self-adhered membrane is generally used, and it also functions as the required secondary water barrier. High-temperature rating matters here: a metal roof in South Florida sun gets hot enough to degrade a standard peel-and-stick product.
Set the eave and rake trim. Drip edge at the eaves, rake trim at the gables, both fastened per the approval. Edge metal is a common initiating point of roof failure in high wind, so this is not a finishing detail.
Snap chalk lines and set the first panel square. The first panel decides every panel after it. On a long run, being a quarter inch out of square at the eave becomes several inches of misalignment at the ridge.
Lay panels with the correct overlap. The paired edge crimps of the next panel sit over the previous one, laid into the prevailing weather direction so the seam faces away from driving rain.
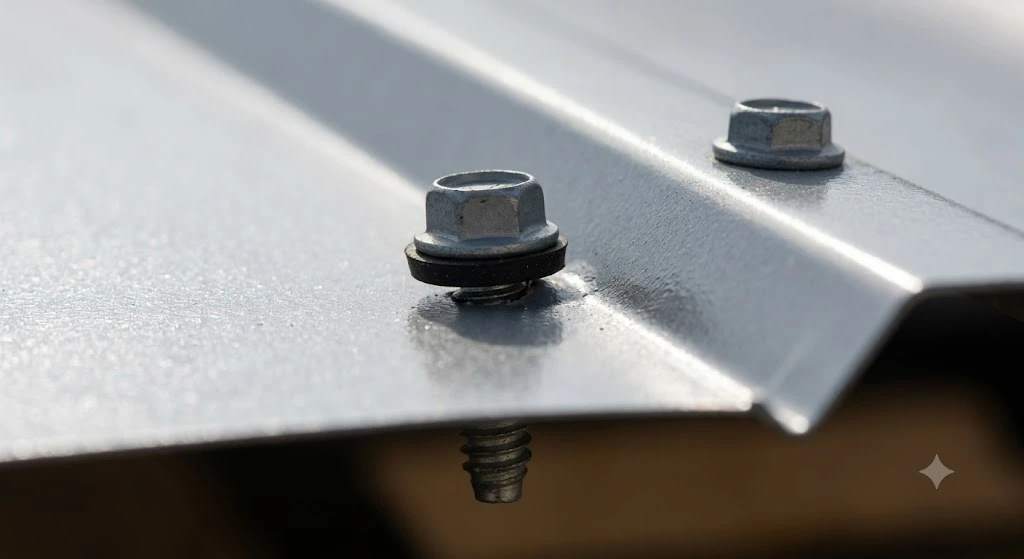
Fasten to the approved pattern. Gasketed screws with neoprene washers, driven through the flat of the panel adjacent to the rib, at the spacing named in the product approval, with increased density at eaves, rakes and ridge.
Detail the penetrations. Pipe boots rated for high temperature and matched to the panel profile, with sealant and fasteners per the manufacturer. Valleys, headwalls and sidewalls all get formed flashing rather than sealant alone.
Close the ridge. Ridge cap over closure strips shaped to the panel profile, which keep out wind-driven rain and wildlife while allowing ventilation where the design calls for it.
The details that decide whether it lasts
Screw torque
The most common failure on exposed fastener roofs, and it is invisible from the ground. Overdriven screws crush the neoprene washer and it splits within a few seasons. Underdriven screws never seal at all. Correct is the washer compressed just enough to bulge slightly at the edge, and it comes from a screw gun with a depth-setting clutch rather than from feel.
Through the flat, not the rib
Fastening through the raised rib leaves the screw unsupported and it works loose as the panel moves. Screws go through the flat pan of the panel where the metal is bearing on the deck. Follow the approval; it is specific.
Thermal movement
Metal expands and contracts substantially across a Florida day. Long panel runs need that accounted for, and fasteners that pin the panel rigidly at both ends will elongate their holes over time. This is one reason standing seam, with its clip system, outperforms exposed fastener on very long runs.
Cutting method
Panels are cut with shears or a nibbler, never with an abrasive saw. A grinder throws hot steel filings across the panel, they embed in the coating and rust, and the roof develops orange freckles within a year. If you see a chop saw on a metal roofing job, that is a finding.
Key takeaway: On an exposed fastener roof the panels rarely fail. The fasteners and the flashings do.
Slope, and where 5V does not belong
Exposed fastener metal panels generally require a minimum slope of 3:12. Some assemblies allow lower with a specified underlayment and sealed laps, but that permission comes from the product approval rather than from a rule of thumb.
Below the minimum, water moves too slowly, sits at the laps and finds every fastener penetration. This is the single most common reason a 5V roof leaks: it was installed on a slope it was never rated for, often on a porch or an addition tacked onto a steeper main roof.
For genuinely low slopes, the answer is a low-slope system rather than a metal panel. See our guidance on choosing between TPO, EPDM and modified bitumen for what those options look like.
HVHZ approval and permitting
In Broward and Miami-Dade, the panel, the fasteners, the underlayment and the trim are approved together as an assembly under a Miami-Dade Notice of Acceptance or Florida Product Approval. The fastener spacing in that approval is not advisory, and zone-based increases at perimeters and corners apply just as they do on any other system.
The job needs a permit and a dry-in inspection before panels go on, because once the metal is down nobody can verify the deck nailing or the underlayment. Our guide to HVHZ roofing requirements sets out the full sequence.
Maintaining a 5V roof so it reaches its potential
Exposed fastener roofs are low maintenance rather than no maintenance, and the difference between a 20-year and a 45-year 5V roof is entirely a maintenance question.
A realistic schedule:
Annually: a visual check for backed-out screws, which show as a raised head or a slightly proud washer, and for lifted or displaced trim after wind events. Clear debris from valleys, which trap leaves and hold moisture against the panel.
Every 3 to 5 years: inspect sealant at penetrations, headwalls and sidewalls. Sealant is a consumable, and Florida UV shortens its life considerably.
At 15 to 20 years: a full screw replacement pass. New gasketed screws, one size larger in diameter so they bite fresh material rather than re-using an enlarged hole. This is the single highest-value maintenance item on the roof.
Coastal properties: rinse the panels with fresh water periodically, particularly on surfaces sheltered from rain such as under overhangs, where salt accumulates rather than washing off. Corrosion on a coastal metal roof usually starts in the places rain never reaches.
Two things to avoid entirely. Never use a pressure washer at close range on a metal roof; it drives water up under laps and can damage the coating. And never patch a leak on a metal roof with roofing cement or a generic sealant blob. Metal moves with temperature, the patch does not, and it splits within a season. Leaks on a metal roof are fixed by correcting the fastener or reforming the flashing.
Product approvals for metal roofing assemblies used in the High Velocity Hurricane Zone can be checked at floridabuilding.org.
Key takeaway: Diary the screw replacement pass at year fifteen. It is the one maintenance item that decides whether you got a 20-year roof or a 45-year one.
Cost and service life
5V crimp installed: roughly $9 to $16 per square foot in South Florida, varying with gauge, material, roof complexity and tear-off scope.
Standing seam installed: roughly $12 to $20 per square foot.
Architectural shingle installed: roughly $5.50 to $9.00 per square foot.
Panel service life: commonly 40 years or more for Galvalume or aluminium in this climate.
Fastener service life: roughly 15 to 20 years before the neoprene washers need attention. Budget a screw replacement pass at that point; it is the maintenance item that decides whether the roof reaches its potential.
That last line is what separates a 40-year metal roof from a 20-year one, and it is almost never mentioned at the point of sale.
Roofing Network installs 5V crimp metal roofing and other metal roof systems across Broward, Miami-Dade and Palm Beach counties under Florida license CCC1329271, with the approval number for the proposed assembly stated on every quote.
On an exposed fastener roof the panels rarely fail. The fasteners and the flashings do.
Roofing Network | Oakland Park, FL
Frequently asked
How is 5V crimp metal roofing installed?
Over a solid deck with an approved underlayment, with panels laid so the paired V crimps at the edges overlap the previous panel, secured with exposed gasketed screws driven through the flat of the panel to the spacing in the product approval. Eave and rake trim go on first, and ridge cap over profile closure strips finishes it.
What is the minimum roof slope for 5V crimp metal panels?
Generally 3:12 for exposed fastener metal panels. Some assemblies permit lower slopes with a specified underlayment and sealed laps, but that permission comes from the product approval rather than a rule of thumb. Installing below the rated slope is the most common reason a 5V roof leaks.
How much does a 5V crimp metal roof cost in South Florida?
Roughly $9 to $16 per square foot installed, depending on gauge, whether steel or aluminium is used, roof complexity and tear-off scope. Standing seam runs about $12 to $20 per square foot, and architectural shingle about $5.50 to $9.00, so 5V is the least expensive route onto a metal roof.
How long do the screws last on an exposed fastener metal roof?
The neoprene washers typically need attention at around 15 to 20 years, well before the panels themselves, which commonly last 40 years or more. Budget a screw replacement pass at that point; it is the single maintenance item that decides whether the roof reaches its full service life.
Should metal roofing screws go through the flat or the rib?
Through the flat pan of the panel, where the metal bears on the deck, adjacent to the rib. A screw driven through the raised rib is unsupported and works loose as the panel moves with temperature. The exact pattern and spacing come from the assembly's product approval.
Keep reading
More answers on the same topic.
HVHZ Roofing Requirements in South Florida
Two counties, one set of rules that does not apply anywhere else in Florida. Here is what HVHZ changes on your roof and your quote.
View details
TPO vs EPDM vs Modified Bitumen in Florida
Florida is cooling-dominated, which rules one of these three out for most buildings before anything else is compared.
View details
Where to Buy Replacement Concrete Roof Tiles in FL
Five sourcing routes, and the one professionals actually use: take tile from a slope nobody sees and put the new ones there.
View details