
Commercial Roofing
How to Fix a Commercial Roof Leak: A Field Guide
Fixing a commercial roof leak means finding the entry point rather than the drip point, because water travels along decking and steel before it appears inside. Start at the nearest penetration, seam or drain uphill of the interior stain, verify with a controlled water test, then make a documented repair rather than a bucket-and-hope patch.
John Kraja
Certified Roofing Contractor, License CCC1329271 | Roofing Network
8 min read
Key takeaways
The interior drip is almost never directly below the entry point; water travels along deck flutes and steel joists first.
More than 90 percent of commercial flat roof leaks originate at penetrations, seams, flashings and drains, not in the open field.
Photograph everything before you touch it. Insurance and warranty claims both depend on pre-repair documentation.
Wet insulation does not dry out under a membrane. If it is saturated, it must be cut out and replaced.
When annual repair spend passes roughly 25 to 30 percent of replacement cost, patching has stopped paying.
To fix a commercial roof leak, find the entry point rather than the drip point. Water entering a flat roof runs along metal deck flutes and joists, sometimes thirty or forty feet, before it finds a fastener hole or seam to fall through, which is why the stain on your ceiling tile is rarely under the actual breach. Work uphill from the interior evidence, inspect every penetration, seam, flashing and drain in that zone, confirm with a controlled water test, then repair the substrate as well as the surface. Skipping the substrate is why the same leak comes back in October.
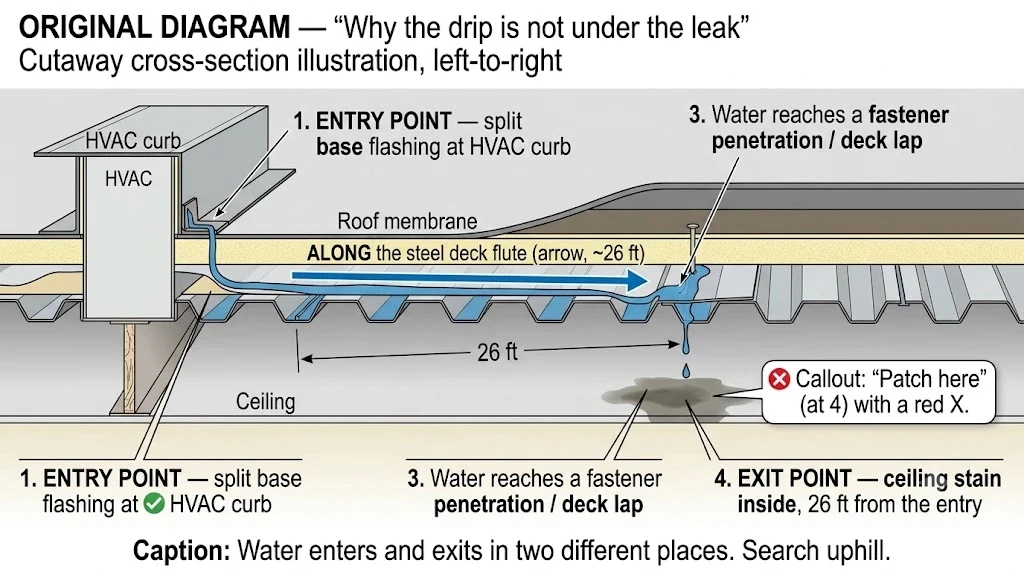
A facility manager in Fort Lauderdale showed us a section of TPO with eleven patches on it. Every one had been applied directly above where the water appeared inside. The actual failure was a split in the base flashing of an HVAC curb, twenty-six feet away and four inches higher.
Eleven repairs, none of them wrong in execution, all of them in the wrong place.
Step 1: Stop the interior damage first
Before anyone goes on the roof, protect what is underneath. On a commercial building the water damage bill routinely exceeds the roof repair bill by an order of magnitude.
Move inventory, equipment and documents out of the drip zone.
De-energise circuits and light fixtures in the affected area. Water tracking along conduit is a genuine electrical hazard, not a theoretical one.
Puncture a bulging ceiling tile deliberately over a bucket. A sagging tile holding water will drop the whole load at once, usually onto something expensive.
Photograph and video everything before you move it, with timestamps on. This is the evidence your insurer will ask for later.
Note the exact date, time and weather. Whether the leak coincides with wind-driven rain from a specific direction is diagnostic information.
Key takeaway: Documentation created before the repair is worth more than documentation created after it. Florida Statute 627.70132 gives you one year from the date of loss to file a new property insurance claim, and the claim will be judged on what you recorded on day one.
Step 2: Understand where water actually travels
Most South Florida commercial buildings sit on steel deck with insulation and a membrane above. The deck runs in flutes, and those flutes act as channels. Water entering at a failed seam runs along a flute until it reaches a fastener penetration, a deck lap or a joist, and only then does it drop into the building.
Three consequences follow, and they explain most failed repairs:
The interior stain marks the exit, not the entry. Search uphill and upstream of it.
A single entry point can produce several separate interior drips.
Saturated insulation acts as a reservoir. It can keep dripping for days after the rain stops, which makes people chase leaks that are not currently active.
Step 3: Inspect the four places leaks actually start
Open-field membrane failures are uncommon. In practice, leaks concentrate in four locations, and a systematic sweep of them finds the great majority.
Penetrations
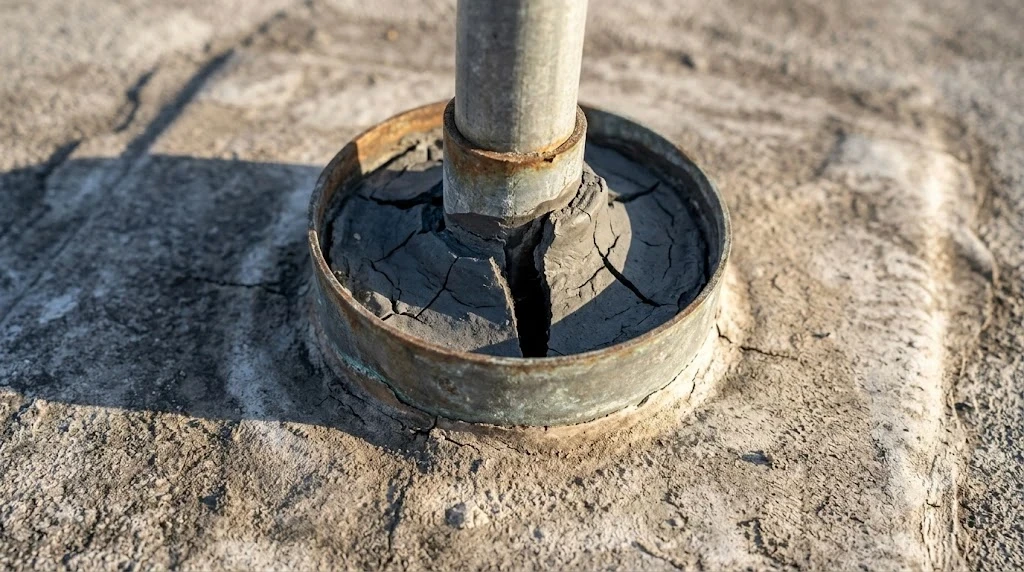
HVAC curbs, exhaust fans, vent stacks, conduit, gas lines, drains and skylights. Check the base flashing for splits, the pitch pans for shrunken or cracked sealant, and the clamping bands at pipe boots. Pitch pans are a maintenance item that almost nobody maintains; sealant shrinks and opens a direct path to the deck.
Seams and laps
On TPO and EPDM, probe the seam edge with a dull screwdriver or seam probe. A properly welded seam resists it; a cold weld opens. On modified bitumen, look for fishmouths where the lap edge has lifted into a curl.
Perimeter and transition details
Parapet walls, counter-flashing, coping caps, expansion joints and roof-to-wall transitions. Loose or open coping joints on a parapet let wind-driven rain into the wall cavity, which then appears inside and looks exactly like a roof leak. In coastal South Florida, wind-driven rain intrusion at parapets is a common misdiagnosis.
Drains and low points
Clogged drains, failed drain clamping rings, and ponding water that never clears. Any area still holding water 48 hours after rain is a defect: it accelerates membrane degradation, adds structural load, and finds every weakness underneath it.
Key takeaway: If you inspect penetrations, seams, perimeter details and drains, you have covered where the overwhelming majority of commercial leaks begin.
Step 4: Confirm it with a water test
Do not repair on suspicion. Confirm it.
Station someone inside directly at the drip location with a radio or phone. On the roof, start at the lowest suspected point and run a garden hose for ten minutes at a time, working uphill in isolated sections. Test one variable at a time: drain first, then the base of the nearest curb, then the seam above it. Allow ten to fifteen minutes between zones, because water takes time to travel.
When the interior observer reports water, you have your entry point. When you have run every candidate zone with no result, the entry is likely a wall, window or parapet issue rather than a roof issue, and you have saved yourself a pointless roof repair.
For roofs where hose testing is impractical, infrared thermography after sunset shows wet insulation as warm areas because saturated material releases stored heat more slowly than dry material. Electronic leak detection, using low-voltage or high-voltage vector mapping, locates breaches on a membrane to within inches and is the right tool on large or complex roofs.
Step 5: Make the repair, and repair the substrate too
A surface patch over saturated insulation is a countdown, not a repair. Wet insulation under a membrane does not dry; it holds water against the deck, loses R-value permanently, promotes corrosion on steel decks, and re-wets the patch from below.
A correct repair sequence for a membrane roof:
Cut out the membrane around the breach and probe the insulation. If it is wet, keep cutting until you reach dry material.
Remove and replace the saturated insulation with matching material at matching thickness.
Install a new membrane patch of the same material, correctly welded or adhered with the manufacturer's required overlap, not a generic mastic smear.
Re-flash the detail properly where the failure was at a penetration. Replace the pitch pan filler rather than adding sealant on top of failed sealant.
Photograph each stage. If the roof is under a manufacturer warranty, an unauthorised repair by an uncertified contractor can void it, so confirm who is permitted to work on it before anyone starts.
Emergency temporary measures have their place during active rain: a peel-and-stick membrane patch, a shrink-wrapped tarp mechanically secured at the edges, or a water diverter routing flow to a drain. What has no place is roofing cement smeared on a wet membrane. It does not bond, it fails within weeks, and it contaminates the surface so the permanent repair has to remove it first.
Step 6: Know when patching has stopped paying
Every commercial roof reaches a point where repair spend is subsidising a decision nobody wants to make. Four signals mark it:
Annual repair spend exceeds 25 to 30 percent of replacement cost. Two more years of that and you have bought a new roof without owning one.
Leaks appear in new locations each season. That is systemic membrane or fastener failure, not isolated damage.
A moisture survey shows more than roughly 25 percent of the insulation is wet. Beyond that threshold, sectional replacement stops being economical.
The roof is past 80 percent of its expected service life. Modified bitumen at 15 to 20 years, TPO at 20 to 25.
At that point the honest options are a full commercial roof replacement, a silicone coating restoration if the substrate is genuinely dry and structurally sound, or an SPF overlay where you also want insulation and drainage correction in the same operation. A moisture survey decides which of the three is available to you; opinion does not.
Stop the next one: the maintenance that actually prevents leaks
Most commercial roofs in South Florida fail early for the same unglamorous reason: nobody looked at them. Two inspections a year and a documented drain clearing programme prevent a meaningful share of the leaks we get called to.
A realistic minimum programme:
Twice-yearly inspections, timed for late May before hurricane season and late November after it, with a written report and photographs each time.
Quarterly drain and scupper clearing. Debris at a drain is the cheapest possible thing to fix and one of the most expensive to ignore, because ponding accelerates membrane degradation and loads the structure.
Post-storm inspection after any named event or any wind event above roughly 50 mph, whether or not there is a visible leak inside.
Annual sealant review at pitch pans, counter-flashing and termination bars. Sealant is a consumable, not a permanent detail, and it typically needs attention every three to five years in Florida UV.
A roof access log. Every trade that goes up, from HVAC to telecoms, is a potential new penetration. Knowing who was on the roof in March explains a great deal about a leak in June.
There is a warranty dimension too. Most manufacturer warranties on commercial systems require documented maintenance, and a claim can be declined where no inspection records exist. The inspection programme is often cheaper than the exclusion it prevents.
Key takeaway: Clear drains, log roof access, inspect twice a year, and keep the reports. That is most of commercial roof maintenance, and it costs a fraction of one emergency call-out.
Who to call, and what to ask
In South Florida, verify the contractor holds a Florida certified roofing contractor license, a CCC prefix rather than a local registered RC prefix, and that they carry both general liability and workers' compensation. Check the license yourself through the Florida Department of Business and Professional Regulation at myfloridalicense.com.
Then ask four questions: how will you locate the entry point, will you cut and probe the insulation or only patch the surface, is your repair compatible with my existing manufacturer warranty, and what does the written report include. A contractor who cannot answer the second question is quoting a patch, not a repair.
Roofing Network provides commercial roof leak repair across Broward, Miami-Dade and Palm Beach counties, with 24/7 emergency response for active water intrusion, under Florida license CCC1329271.
Eleven repairs, none of them wrong in execution, all of them in the wrong place.
Roofing Network | Oakland Park, FL
Frequently asked
How do you find the source of a commercial roof leak?
Start uphill of the interior drip, because water travels along deck flutes before it falls through. Inspect penetrations, seams, perimeter flashings and drains in that zone, then confirm with a controlled hose test, running one isolated area at a time while an observer watches the interior. Infrared or electronic leak detection is used on large or complex roofs.
Can you patch a commercial roof leak yourself?
Temporary measures during active rain are reasonable: a peel-and-stick patch, a secured tarp or a water diverter. A permanent repair requires cutting out saturated insulation and welding or adhering a matching membrane patch, and an unauthorised repair can void a manufacturer warranty. Roofing cement on a wet membrane will not bond and fails within weeks.
Why does my commercial roof still leak after it was repaired?
Usually because the repair was made below the interior drip rather than at the actual entry point, or because saturated insulation was left in place under a surface patch. Wet insulation does not dry under a membrane; it holds water against the deck and re-wets the repair from below.
When should a commercial roof be replaced instead of repaired?
When annual repair spend passes roughly 25 to 30 percent of replacement cost, when leaks appear in new locations each season, when a moisture survey shows more than about 25 percent of the insulation is wet, or when the roof is past 80 percent of its expected service life. A moisture survey, not an opinion, should make the call.
Will an emergency roof repair void my commercial roof warranty?
It can. Most manufacturer warranties on commercial systems restrict who may work on the roof and what materials may be used, and many also require documented maintenance records. Check the warranty terms before authorising work, and where possible use a contractor certified for that specific system so the repair is made with approved materials.
Keep reading
More answers on the same topic.
SPF Spray Foam Roofing in Florida: Cost & Lifespan
SPF is the only commercial roof system that is seamless, self-flashing and insulating at once. It is also the least forgiving of poor prep.
View details
When to Call a Roofer for a Roof Leak (7 Signs)
Sagging ceiling, water near electrics, daylight through the deck: those do not wait. A slow stain can wait a few days, not a few months.
View details
Does an HOA Cover Roof Replacement in Florida?
Condo boards own the roof by statute. HOA boards often do not. Here is how to read your declaration and settle the question in ten minutes.
View details